Why Dallas Homeowners Are Rethinking Their Oak Furniture
Walk through the older neighborhoods of east Dallas, the M-Streets, Lakewood, Preston Hollow, and you’ll find the same thing in almost every garage or spare bedroom: a solid oak dining set, an oak entertainment center with that familiar orange-honey tone, or a set of oak Shaker cabinets that have seen better decades. These pieces were built to last, and structurally they almost certainly still are. What hasn’t held up is the finish, or more accurately, the finish no longer fits the room it lives in.
Oak is one of the most popular furniture woods ever used in American homes, and for good reason. It’s dense, hard, and durable. But it’s also one of the most technically demanding woods to refinish well. The grain structure is radically open compared to species like maple or cherry, which means stain behaves differently, sometimes beautifully, sometimes in ways that surprise first-time DIYers. Understanding why oak does what it does with stain is the difference between a piece that looks restored and one that looks painted over.
At Andrew’s Refinishing, we’ve been working with oak as part of our Dallas furniture refinishing service since 1980, 45 years of oak dining tables, Mission-style chairs, Bassett dressers, and golden-oak entertainment centers from across the metroplex. Here’s what we’ve learned about this wood and why the approach matters as much as the stain color you choose.
White Oak vs. Red Oak: Two Different Animals Under the Stain Brush
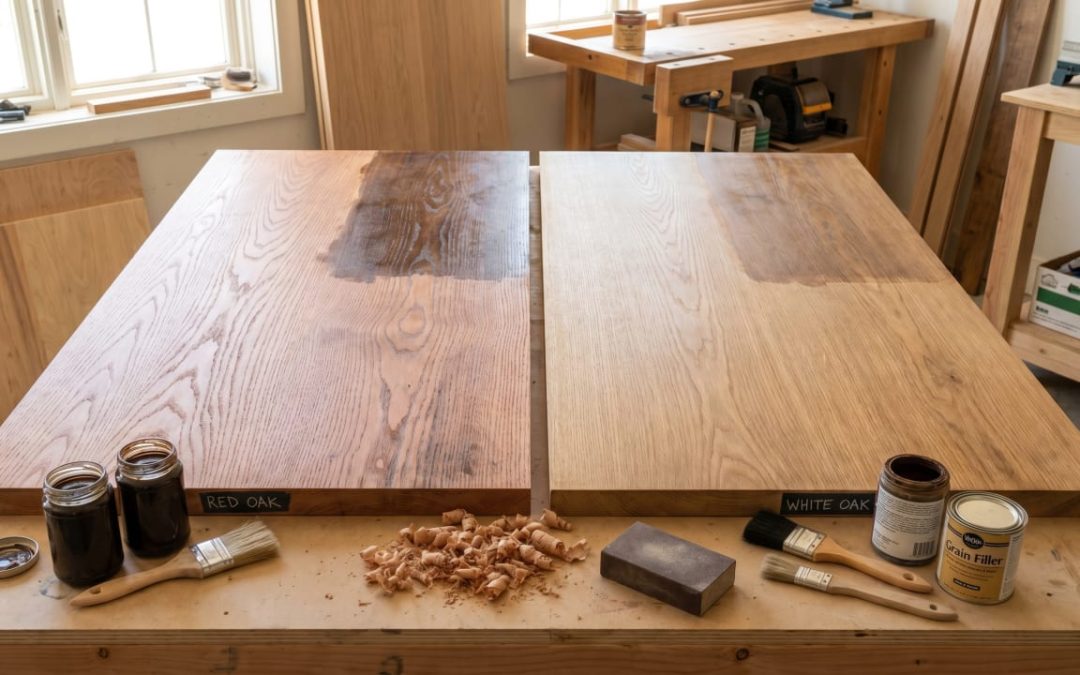
Most homeowners think of “oak” as a single species, but the two you’ll encounter most often, white oak and red oak, behave quite differently in the finishing room. Knowing which one you have changes everything about the process.
Red oak is what filled most American furniture showrooms from the 1960s through the late 1990s. It’s the species behind the golden-honey dining sets, the Bassett and Lane oak bedroom suites, the ubiquitous oak kitchen cabinetry installed in thousands of homes during the 1980s and 1990s. Red oak has a distinctly pink-to-orange undertone in its raw wood, and its pores are genuinely open, large, ring-porous channels that run along the grain. When you apply an oil-based finish over red oak without any prep work, those warm undertones amplify. That’s where the orange-shifting lacquer you’re trying to move away from came from in the first place.
White oak has tighter, more closed pores and a cooler gray-olive undertone. It became the darling of contemporary and Scandinavian-influenced furniture in the 2010s for exactly that reason, it reads as calmer, more neutral. White oak also contains significantly higher tannin levels than red oak, which matters for a historical finishing technique we’ll cover shortly. Mission-style furniture, Stickley pieces, and Arts and Crafts-era case goods were almost always built in white oak for that reason. If you have a family Mission set in your home, it’s almost certainly white oak.
According to Fine Woodworking’s in-depth comparison of the two species red oak’s warm undertone is amplified significantly by oil-based finishes like the polyurethanes used on commercial work, while white oak’s cooler tone remains more stable across finish types, which is why white oak is increasingly specified for modern interiors. Understanding which species you have determines which stain approach will actually achieve the look you’re after.

The Open-Grain Problem: Why Oak Stains Unevenly Without Proper Prep
Here’s the core technical challenge with oak refinishing, and it’s the one that catches homeowners most off guard when they attempt a DIY project: oak’s open pore structure means that stain doesn’t lay down evenly on its own. The pores, those visible grain channels that give oak its characteristic look, absorb pigment at a dramatically different rate than the surrounding wood fiber. Without intervention, the pores go very dark while the flat wood between them stays lighter. The result is a high-contrast, blotchy appearance that reads as “stained” rather than “refinished.”
This isn’t a defect, it’s physics. Ring-porous hardwoods like oak, ash, and elm have large, consistent pore openings that act as reservoirs for liquid stain. Manage those reservoirs correctly and you get rich, even color with beautiful grain definition. Ignore them and the pores fight you every step of the way.
As Popular Woodworking’s guide on pore filling explains, the order in which you apply filler and stain changes the final look dramatically. Apply filler first and you reduce the surface area the stain anchors to, producing more even coloring. Leave the grain open and the pores will absorb far more pigment than the surrounding wood. Neither approach is wrong, they produce different looks, but you have to choose deliberately, not accidentally.
This is why professional refinishing on oak almost always begins with a conversation that a furniture store never has with you. We look at the piece, assess whether the existing finish needs full stripping or can be scuffed and re-coated, and then decide: are we filling the grain for a smoother, more even result, or are we celebrating the open pores as part of the visual texture? Both are valid for oak, they just require different prep sequences and serve different aesthetic goals.
Stain Options for Oak: Pigment, Dye, and Gel Explained
Once the surface is properly prepped, you have three broad categories of stain to work with on oak, and each behaves differently on this species. Choosing the wrong type for your intended look is one of the most common mistakes we see on pieces brought to our Carrollton workshop.
Pigment stain is the most common type, it’s what most homeowners think of when they think “stain.” Pigment particles are suspended in a carrier (oil- or water-based) and lodge in the wood’s pores and surface scratches. On oak, this means the pores go notably darker than the surrounding wood, amplifying the grain contrast. If you want that defined, dramatic grain look, the kind that reads as “classic oak”, pigment stain delivers it. The flood-and-wipe technique is critical: apply liberally, wait 5–15 minutes depending on the carrier, then wipe off everything the wood hasn’t absorbed. Timing matters more on oak than on almost any other species.
Dye stain penetrates the actual wood fiber rather than sitting in the pores, producing a more transparent, even color that doesn’t over-emphasize the grain. It’s excellent for achieving a lighter, more even tone, say, a gray-washed or silver-cerused effect on white oak, without the stark contrast of a pigment. The catch: dye must be wiped immediately while still wet. Let it dry on the surface and it reverts to a powder that prevents proper finish adhesion.
For a deeper look at how these three stain types behave on different species and surfaces, this comprehensive stain application guide from Start Woodworking Now covers the pigment vs. dye vs. gel breakdown in practical detail, including the critical timing windows that matter most on open-grain species like oak.
Paste Grain Filler: When to Use It and When to Leave the Grain Open
Paste grain filler, sometimes called pore filler, is a product that bridges the pore openings before staining or finishing, producing a smoother surface. On oak, you typically need two to three applications because the pores are large enough that a single pass won’t fully level them. The filler is worked across the grain with a stiff brush or burlap, packed into the openings, and the excess is scraped off once it hazes over.
The decision of whether to fill or not isn’t aesthetic preference alone, it affects the topcoat behavior too. Lacquer flows into unfilled pores and can telegraph the grain texture through successive coats, especially under raking light. If a client wants a glass-smooth finish on a dining table, the kind that looks and feels like it was poured on, we fill the grain. Period.
But open grain has its own appeal on oak. Some of the most beautiful Mission and Craftsman-era finishes deliberately leave the pores visible, letting the topcoat settle into the channels and preserving the tactile quality of the open grain that defines Arts and Crafts furniture. For a complete walkthrough of our refinishing process from stripping through final topcoat, you can see exactly how we sequence these decisions at the workshop level.
A Brief History: Ammonia Fuming and the Mission Furniture Tradition
If you have a genuine Arts and Crafts or Mission-style piece, a Gustav Stickley quartersawn white oak bookcase, a Roycroft settle, an early-twentieth-century library table, you may have wondered how that rich, dark gray-brown color was originally achieved. The answer isn’t stain at all. It’s chemistry.
Ammonia fuming was introduced to American furniture-making by Gustav Stickley around 1901. The technique involves placing white oak in a sealed chamber with shallow containers of ammonium hydroxide solution. The ammonia vapor reacts with the tannins naturally present in white oak (and white oak specifically, red oak’s lower tannin content produces a much weaker reaction), converting the wood itself to a rich, warm brown that penetrates several millimeters into the fiber rather than just coating the surface. According to the Wikipedia entry on ammonia fuming the technique was actually discovered accidentally in England after stable workers noticed that oak boards stored near horses had darkened, ammonia fumes from the horses had reacted with the wood’s tannins.
The practical upshot: if you have a Mission-era white oak piece and the color has faded or been stripped, restoring it authentically means understanding that the original color came from a chemical reaction, not a stain. A properly matched dye can approximate the look, but a craftsman who understands the original process will get you closer to a true restoration. We see these pieces come through the workshop regularly from older neighborhoods with housing stock where Arts and Crafts design had real roots.
The Golden-Oak Problem: Why 1980s Oak Looks Orange Today
This is the question we hear more than any other. “I inherited my grandmother’s dining set. It’s solid oak, perfectly built, but that golden orange color isn’t working in my house anymore. Can you make it darker?”
Yes, with the right prep and realistic expectations. Here’s what’s actually happening with those 1980s pieces: the original manufacturer applied an oil-based lacquer over unprimed red oak. Over the decades, that lacquer has ambered, oil-based finishes oxidize and shift toward yellow and orange over time, especially under UV exposure. What started as a warm honey tone has become the distinctly orange “golden oak” look that now feels dated in most homes. (Grain filler isn’t part of the ambering story, it’s a separate aesthetic choice we only do when the customer requests it.)
Darkening that finish isn’t a simple re-coat job. The existing finish needs to come off, full stripping back to bare wood, before you can control the new color. Once the wood is bare, the options open up: a gray-toned dye wash to neutralize the red undertones before applying a brown topcoat, or a Jacobean pigment stain for the richest dark result. The key is that first step: you cannot put a cool, dark stain over an orange lacquer and expect anything but a muddy result.
For homeowners with an entire kitchen full of golden-oak builder-grade cabinets, the same logic applies, and cabinet refinishing is a natural extension of this work. Our kitchen and bath cabinet refinishing service handles exactly this scenario: stripping the old finish, neutralizing the orange undertones, and applying a new stain-and-topcoat system that fits the modern kitchen rather than the 1987 one. It’s typically one-third the cost of replacement with a visually equivalent result.

Topcoat Choices for Oak Furniture: Durability, Clarity, and Grain Character
The stain sets the color; the topcoat determines how the piece lives in the world. On oak furniture, especially dining tables, which take real daily abuse, the topcoat choice matters as much as anything else in the process.
Nitrocellulose lacquer is our standard residential topcoat across oak pieces, fast to apply and easy to repair, since fresh lacquer re-dissolves into old lacquer, touch-ups blend invisibly without a full strip. On oak dining tables, dressers, headboards, chairs, and accent pieces, lacquer gives a beautiful, clear result with good grain clarity. For commercial oak pieces (restaurants, hotels, offices), we step up to polyurethane, which gives better chemical and moisture resistance for high-use settings.
Common Oak Pieces in DFW Homes and What They Actually Need
After 45 years serving the Dallas-Fort Worth area from our Carrollton workshop, we have a clear picture of what oak pieces are circulating through DFW homes and what each one typically needs.
- Mission-style dining sets: Usually white oak or red oak, typically from the 1980s–2000s. The most common request is darkening from honey to walnut or espresso. Full strip-and-refinish with a dye-plus-pigment stain system is the standard approach. Allow 4-6 weeks for a full set of table and chairs.
- Bassett and Lane oak dressers: Red oak, almost without exception. These were built through the 1970s–90s and are often structurally excellent, the drawer slides and joinery are solid. The finish is the only thing that has aged poorly. Stripping and re-staining in a warmer walnut tone is the most popular result.
- Oak Shaker furniture: Both species appear here depending on the manufacturer. Shaker design’s clean lines mean the finish reads more prominently, grain filler and a smooth topcoat suit these pieces better than a deliberately open-grain finish.
- Golden-oak entertainment centers: The single most common item we see. Usually red oak with heavy orange ambering from the original lacquer. Full strip required; a dye-plus-pigment stain system gives the cleanest new color.
- Oak kitchen and bath cabinets: Builder-grade red oak cabinets installed in DFW homes during the 1985–2000 period. Refinishing is almost always more cost-effective than replacement, typically one-third to one-half the cost of new cabinets with a visually equivalent result.
If you’re not sure which species of oak you have, there’s a simple field test: look at the end grain or a freshly sanded cross-section. White oak’s pores are plugged by tyloses, small structures that block the pore channels, giving it a denser appearance. Red oak’s pores are fully open. The visual difference under good light is also clear: red oak has a pinkish cast, white oak reads more grayish-tan.
Serving Dallas Neighborhoods with Deep Oak Furniture Roots
Dallas has some of the most interesting housing stock in Texas for our work. The M-Streets and Lakewood areas hold mid-century and early-twentieth-century homes where Arts and Crafts and Mission-influenced furniture was original to the decor. We regularly pick up pieces from those neighborhoods for workshop restoration.
Preston Hollow and University Park tend to produce higher-end pieces, custom oak furniture, Stickley originals, and estate pieces that have been in families for generations. These clients often want authentic restoration rather than transformation, which means careful finish matching and sometimes the kind of specialized technique work (fumed-oak replication, period-appropriate shellac topcoats) that a generic refinisher won’t attempt.
Other clients bring us the oak from the 1980s and 1990s housing wave, the entertainment centers, the builder-grade kitchen cabinets, the Bassett bedroom suites. They typically want modernization: go darker, go cooler, lose the orange. That’s exactly the work we’re set up for at the Carrollton workshop.
For structural repairs that often accompany older oak pieces, loose joints, broken chair rungs, damaged veneer on case goods, our Dallas furniture repair service handles those in the same shop. There’s no need to send the piece to two different places when refinishing and repair so often go hand in hand on older oak furniture.
Oak Furniture Refinishing Service Area: Dallas and the DFW Metroplex
We serve Dallas homeowners and businesses throughout the DFW metroplex from our Carrollton workshop at 2425 Parker Rd. Bldg. 5. In addition to Dallas, we regularly pick up and deliver to Fort Worth, Plano, Richardson, Garland, Irving, McKinney, Allen, Lewisville, Highland Park, University Park, Southlake, Coppell, Frisco, Flower Mound, Addison, and Grapevine. Pickup and delivery is available throughout the metroplex for a flat fee based on distance, call us at 214-731-3060 to schedule. If you’re not sure whether your piece is worth the trip, send photos through our free online estimate form and we’ll give you an honest assessment before you move anything out of the house.
Frequently Asked Questions: Oak Furniture Refinishing in Dallas
Can you make my golden-oak dining set darker?
Yes, but the process requires a full strip of the existing finish before we can control the new color. You can’t lay a cool, dark stain over an orange lacquer and get a clean result; the old finish has to come off down to bare wood first. Once we’re there, we have full control: walnut tones, espresso, gray-washed contemporary finishes, or anything in between. The conversion from golden oak to a darker stain is one of the most common requests we get, and the results are dramatic. A dining set that felt dated can read as completely transformed once the orange is out of the equation.
What’s the difference between red and white oak refinishing?
Red oak has an orange-pink undertone and very open pores that absorb stain unevenly without a pre-stain conditioner or grain filler. White oak has a cooler gray-tan undertone, tighter pores, and higher tannin content, making it the only species that responds to ammonia fuming, the historical technique used on Mission and Arts and Crafts furniture. In practice, we approach both species differently from the prep stage forward. Tell us which one you have when you reach out, or send photos and we’ll identify it for you.
Do you refinish oak kitchen cabinets in Dallas?
Absolutely, oak builder-grade cabinets from the 1980s and 1990s are one of the most common projects we handle for area clients. The process involves removing the doors and drawer fronts and bringing them to the Carrollton workshop for stripping, staining, and topcoating, while the cabinet boxes are refinished in place. Total kitchen disruption is typically 5–7 working days. The result is visually equivalent to new cabinets at roughly one-third the cost.
Should I use grain filler on my oak furniture?
It depends on the look you want and the piece’s intended use. For a dining table or surface that takes daily use, grain filler plus lacquer gives you the smoothest, most durable result. For a Mission-style chair or Arts and Crafts bookcase where the open pore texture is part of the aesthetic, leaving the grain open under the lacquer topcoat preserves the tactile character of the wood. We discuss this with every client before we start, there’s no universal right answer for oak, just better and worse matches for the specific piece and finish goal.
How long does oak furniture refinishing take at your Carrollton shop?
Most single pieces, a dresser, a chair, a small accent table, are ready in 4-6 weeks. A full dining set (table plus six to eight chairs) typically runs 6 weeks or more depending on finish complexity and our current workshop queue. Cabinet projects involve a 5-7 day on-site phase for box work and 4-6 weeks in the shop for doors and drawers, scheduled by appointment. We’ll give you a realistic timeline when we quote the project, not an optimistic one.
Ready to Refinish Your Oak Furniture in Dallas?
Oak is a wood that rewards understanding. The species you have, the existing finish’s condition, the look you want, and the topcoat that matches your household’s use patterns, each of these decisions shapes the final result in ways that matter. Getting them right is the difference between a piece that looks genuinely restored and one that looks like it was stained and forgotten.
Andrew’s Refinishing has been doing this work in the Dallas-Fort Worth area since 1980. Our Carrollton workshop handles stripping, staining, grain filling, spray finishing, and structural repair under one roof, no subcontracting, no surprises. We serve neighborhoods across DFW from our Carrollton location.
You can request a free online estimate by sending photos of your piece through our website, no need to haul the furniture in for a quote. Or call us directly at 214-731-3060. We’ll tell you honestly what the piece needs, what it will cost, and whether refinishing makes sense for your specific situation.